Please excuse the broken picture links on the blog. I'm in the process of moving all of my pictures from photobucket to smugmug and it's taking a lot of time. thanks for your patience!
Showing posts with label nestabilities. Show all posts

Tuesday, July 2, 2013

Manatee Love

I made this card for a friend that likes fish and manatees.


ingredients
digital stamp: mermaid with manatee by Paper Nest
white card stock: Paper Trey Ink
blue card stock: Stampin' Up
patterned paper: Stampin' Up
pearls: recollections (??) from Michaels
copic markers: E00, E11, E13, E21, E25, E27, E29,  G14, Y26, Y08, YG01, R30, BG45, BG49, BG45, BG000, V000, V15, V17, W000, W1, W3, W5, W7
punch: ek success
nestabilities

Sunday, May 19, 2013

Baby Gear - Animal Style

A family member told us last year that she was expecting, so of course, a baby quilt and some baby gear were put on my project list. I found out through her pinterest page that she liked zebra stripes and black and pink, and eventually, it was revealed that they were expecting a little girl. So I made her a few zebra themed things. A quilt, a bib, some burp cloths, some tiny shoes, and of course, a card (not zebra themed). I've had these things done for a couple of weeks now but was waiting for the baby to arrive to post them. She had her Friday night! A perfect and beautiful little girl.

the quilt:


the back-very wild!


My usual curved corners-here's a close-up. I did my binding a little differently this time. Normally I sew it to the back, fold it to the front, and zig zag the edge-not really caring how it looks on the back. This time I accepted a challenge from my sister and sewed it to the front, folded it to the back, and sewed in the ditch on the front, catching the back. It was a little slower but I like how it turned out!


a close-up of the label, which I made on my new embroidery machine using EQ Stitch to trace my signature. You can also see the serpentine stitch I used for the quilting. I love this stitch and learned how to program it into my Janome 6600 on the Janome 6500/6600 yahoo group.


The shoes, made from a pattern by Lena's Patterns on Etsy


The bib, made from this tutorial


from the back-it has little armholes and gives pretty good coverage


Half a dozen burp cloths made from cloth diapers-using this tutorial (with a few changes):


And the card-another clothespin card.

ingredients:
kraft and pink card stock, patterned paper, clothespins, and cloud embossing folder: Stampin' Up
white card stock: Georgia Pacific
dies: nestabilities
twine: Divine twine
onesie shape: Lettering Delights Baby Simple Shapes set
font: Hipster Script

Tuesday, September 4, 2012

Make a Cake

I've been wanting to try paper piecing and now I can say I did. I really liked making it! I won this set from a contest at Patty's Stampin' Spot and it is perfect for paper piecing. I used an older Mojo Monday sketch.


stamps: stampin' up make a cake
markers (for the pinwheel): copic
paper: echo park
blue card stock: stampin' up
ink: memento
dies: stampin' up and nestabilities


Monday, August 20, 2012

Nestability organization

We just got back from vacation-that's one reason I haven't posted in a while. It was pretty hectic in the week or two before, getting everything ready, and then we drove from Indiana to Nevada and then to California. I know. Crazy, right? On the trip my son took over the camera and here is a picture he took, I believe, in Colorado.


And here is one of the places we visited in Las Vegas. I'm sure History Channel fans will recognize this.


We didn't see any famous people but we saw a lot of interesting ones!

So the nestabilities. I tried several different methods to organize them. I tried the magnetic folders and the cd cases but nothing worked for me. Then someone at Split Coast Stampers posted this method and I tried it. I love it. It works out perfectly for me. I used some mat board to create some dividers in the box, including one long one on the side for the bigger dies. I used mat boards to put the dies on, and used the magnetic business card things that Staples sells. I cut one in half for each board. On sets that have a really small piece in the center, I put an extra square of magnet there so the small pieces stayed put. Then I made some tabs by printing out the names on card stock and folding and gluing them over the boards that hold my dies. Here's how it looks. I took these with my phone so the quality isn't great but you get the idea.

the box (the top hinges on the back and swings straight up):


the view from the front:


the view from the top:


this shows one board with dies on it:


Friday, May 25, 2012

Snappy Birthday

I made this for the deconstructed sketch challenge #53. I just got this paper pack in the mail and it wasn't quite what I was expecting but it's still pretty cute and goes well with the crab & company set.
stamps: stampin' up crab & company
markers: copic
ink: memento, stampin' up (for sponging)
card stock: stampin' up
patterned paper: echo park paradise beach
border punch: ek success
circle and scallop circle dies: nestabilities

ps-thanks for telling me about feline playful's blog!

Monday, January 2, 2012

2011 Christmas Cards

Yep it's been a while. So anyway, these are the cards I made for Christmas this year.


This first one I made with a freebie file from the Silhouette store. I used my new favorite embossing folder, which is the stars & swirls from Sizzix. The baker's twine is Martha Stewart brand, the white card stock is Neenah and the red card stock and green patterned paper are both from Stampin' Up.


The next one was made with a file from Lettering Delights and cut out with the Silhouette SD. The embossing folder is from the evil Provo Craft. White card stock is Neenah and the rest of the card stock and the patterned paper is from Stampin' Up.


This is almost all from Stampin' Up. The off white card stock is Bazzill, the border punch is Martha Stewart and the baker's twine is Divine Twine from Whisker Graphics. I cased this card from Wrestlermomx2 on Split Coast Stampers. Thanks Wrestlermomx2!


This is a card I made to hold a gift card for my nephew. I used a tutorial from Jennifer McGuire. White card stock is Paper Trey Ink and colored card stock and stamp from Stampin' Up. I'm not sure about the patterned paper. The inside card stock is Bazzill. The image is stamped with memento ink and colored with copic markers. The inside scallop is from a Stampin' Up punch and the outside shapes were cut with nestabilities.

Friday, February 18, 2011

It's a Birthday Blog Hop-with prizes!!


Welcome to the Joyslife.com Birthday Blog Hop where we are wishing Joy a very happy birthday!! This is my very first blog hop so I hope I don't mess up! You may have come here from Ann Marie's blog. If not, then you can do the whole hop by going to Joyslife.com and clicking through to each blog on the hop. In case you get sidetracked, here is a list of all the stops in this hop.


So here is my birthday blog project. I decided to do a birthday place marker and cupcake picks. I love the new Lettering Delights Frogs and Kisses graphic set and svg set. Even though it seems to be a Valentine themed set, I thought it would make a cute froggy birthday theme. I did want to change the colors of my frogs so I used Photoshop to do that.


I used Make-the-Cut and my Cricut to cut out the parts for the place marker. The frog was directly from the svg file but I used googly eyes instead of the cut out eyes. I think frogs look great with googly eyes! I used various MTC functions to make the place marker with the sticking up part (technical terms here). The balloons were made from a balloon graphic I found online and converted to a cut file. For the two-tone balloons I cut out two, used punches to punch the holes, and then layered them together. I used some wire I had on hand to attach them to the place marker.


For the cupcake picks (easy peasy) I just chose a graphic from the Frogs and Kisses set, changed the colors in Photoshop, and resized and printed it onto card stock. For the other side I used a stamp from the All Around Sentiments set from Joyslife.com. I punched my stamped images and my printed images with a circle punch, matted it onto a larger colored circle, and then layered those onto scalloped circles cut with nestabilities. I stuck them together with Stampin' Up Dimensionals with a toothpick in between to stick into the cupcake. The doily is cut from a file I found on this blog and modified.


The bags were from Target. I like to keep bags on hand because I hate wrapping gifts. Hate it. The cupcakes are topped with crushed Smarties. Smarties are the Canadian version of M&Ms. Since my daughter is allergic to nuts, we don't buy M&Ms but Smarties are just as tasty and perfectly safe. I collected the red ones (had to eat a lot of other colored ones to get these), crushed them a little, and sprinkled them on.

Now for the blog candy, courtesy of Joy! Up for grabs is one of her amazing stamp sets, Lots of Pun. This is such a cute set! If you have the Create a Critter cricut cartridge you NEED this set-it goes perfectly with so many of the critters.
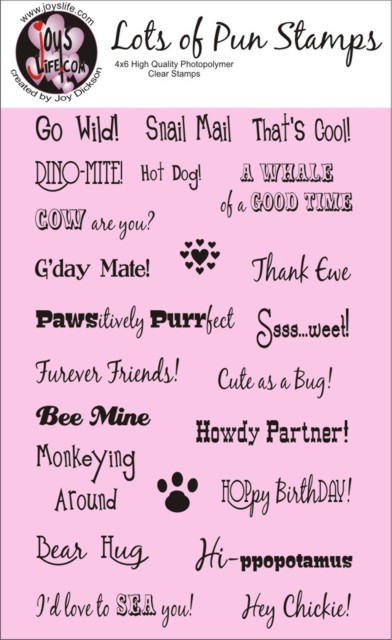

Here is how to win this set:
1. leave a comment on this post
2. become a follower and leave another comment letting me know you did. If you are already a follower of my blog, leave a comment letting me know that instead.

Sign ups end at midnight eastern time on Feb 22nd. Please make sure there's a way for me to get ahold of you. If you don't have your email in your blogger profile, please leave it in the comment for me. If you are interested in buying this or any of Joy's other stamp sets, just go to Joyslife.com's products page. Joy is offering free shipping right now too!

And now on to the next blog in the hop. Just click here to go to Erika's blog to see the next cool birthday project! But first, be sure to grab Joy's cute new button!! To add this button to your blog, simply copy and paste this code:
Joy's Life.com


Monday, January 3, 2011

2010 Christmas Cards

Here are the cards I made and sent this year:

green cardstock, embossing folder, and word stamp: stampin' up
patterned paper: doodlebug
blue cardstock: bazzill
glitter: doodlebug
string: dmc
border punch: ek success
cricut cartridge: joys of the season


cardstock, patterned paper, ribbon, ink, and word stamp: stampin' up
embossing folder: sizzix
wreath stamps: the angel company
dies: nestabilities


blue cardstock, deer stamp, embossing powder, ribbon, tag punch: stampin' up
patterned paper: digital
phrase font: 2 peas
silver cardstock: unknown
dies: nestabilities


(unless you're Japanese or know about Japanese food you may not understand the humor of this one. Trust me-it's funny)
cardstock and patterned paper: stampin' up
embossing folder: sizzix
markers: copic
stamp: 2 scoops rice designs
dies: nestabilities

this is a small bag I made for giving away candy canes

paper: die cuts with a view
tag punch: stampin' up
stamp: stampendous (I think)
ribbon: unknown
snowflake: cricut (joys of the season cart) and a punch
bag: cricut (tags, bags, boxes & more cart)

Tuesday, December 7, 2010

Thinking of You - sympathy card

A friend of mine lost her mother recently so I made this card for her. I haven't made many sympathy cards so I never quite know how it should look but this came out nice, I think. I used an older mojo monday sketch.

stamps-stampin up
ink-memento black
markers-copic (see below)
papers-stampin up
nestabilities
ribbon-unknown
punch-stampin up

copic colors used:

Tuesday, March 30, 2010

Penny Black Cow

I haven't done any stamping in so long I almost forgot how. My sister in law just had a medical procedure done and will be recovering for a bit, so I made this card for her. She and her husband used to have a dairy farm, so that's why I used the cow. Plus she prefers funny or cute cards rather than the mushy type. I used an older sketch from Taylored Expressions AND I used my copic airbrush thing for the first time. It's definitely uneven and splotchy but I suppose it takes a lot of practice. I also paper pieced the balloon plus I shaded it with copics and I colored over it all with a clear spica glitter pen.

Oh and I completely forgot to take pictures of the markers I used.

stamp: Penny Black Stamps
Copic markers and airbrush kit
Spica glitter pen
Sakura Gelly Roll pen (white for shine on the balloon)
Stampin' Up cardstock, patterned paper and hardware
Sewing machine
Nestabilities

Sunday, March 21, 2010

Happy Meal Toy

My kids love McDonald's-probably more for the toys than the food. Right now the toys are iCarly and Star Wars. My 12 year old LOVES iCarly so we've been to McD's a lot, where she has collected several of these little laptop notepad holders. I noticed that the size is perfect for holding a 3 x 3 post it pad so I took one and decided to fix it up a little. Here is the before and after:

before, closed


before, opened


after, closed


after, opened (I would probably find a better color post it pad-this is one pretty bright). Also the color is a little off in this-probably due to that post it pad (and my lack of skill with custom white balance).


Papers and flowers from Stampin' Up plus I used liquid pearls, a labels 1 Nestabilities die, and a Sakura Gelly Roll white gel pen.

And here's a sneak peek of the quilt I am working on right now. I'll post it when it's all done.


Wednesday, December 16, 2009

Two Christmas cards-and a sketch challenge

I'm posting only two of my cards right now. The other two cards I did are going to people who read my blog-so I'll post them later.

This one is made with a digital stamp that I found here. I used the same background as the freebie but changed the color and then put the image on top and then printed it. I colored it with copic markers. I tried shading and all that but the colors looked so light (pink instead of red, for example) so I just colored it solid. The markers I used (forgot to take a picture) are C5, G07, G17, R17 and Y38. I printed the image on shimmery cardstock but you can't tell from the picture. It's shimmery though. I used some Stampin' Flock on the white parts of the hat. Cardstock and patterned paper are from Stampin' Up and the Christmas Greetings stamp is from..I think Hero Arts. Embossing folder from Cuttlebug. For this card I used Aly's sketch shown here, turned on its side. I didn't have room for the 3 dots so I left them out. I didn't want to make square cars since I don't have enough envelopes that size and shape.


the sketch:


This next one was made using a digital kit by Crystal Wilkerson. I printed the patterned papers onto some cardstock and then cut them up just as I would regular patterned paper. The tree and sentiment were printed on shimmery cardstock. I cut the tree out and glued it to the oval (which is SU vanilla cardstock). I also used nestabilities and my SU scallop border punch. Kraft cardstock is from Stampin' Up. I used stickles at the top of the tree.


Monday, October 26, 2009

More WCMD cards

I'm posting more than one today

This one was for a red and yellow color challenge. I don't usually use red and yellow together that much so it really was a challenge. I think this is a bit busy but I was happy to finally use this set.

Everything except the spica pens (for the red dots), the die, and the sun punch are from SU. The sun punch is from EK Success and the die (for the shape behind the flower) is nestabilities.

This one was for a sketch challenge. It's a belated birthday card for my nephew-it is not easy to make teen boy cards and I have NO teen boy stamps! So I used a digital image.

copics used:

digital stamp from birdscards, papers from SU (white cardstock is from PTI), copic markers, stickles (on the snow), snowflake punch from carl, spica pens (to color the snowflakes), wave punch from ek success, computer font.
Related Posts Plugin for WordPress, Blogger...