Please excuse the broken picture links on the blog. I'm in the process of moving all of my pictures from photobucket to smugmug and it's taking a lot of time. thanks for your patience!

Tuesday, December 30, 2008

Easy Layered Cabbage Rolls

We always eat cabbage on New Year's Day and also black eyed peas (which I love and don't know why we don't eat those more often). Here's the cabbage recipe I make every single year. It is easy and we love it.

Easy Layered Cabbage Rolls

1/2 head cabbage, coarsely chopped
1 lb ground beef
1/2 small onion, chopped
1/8 tsp garlic powder
1/4 tsp salt
dash pepper
1/2 tsp chili powder
1/3 cup uncooked rice
1 can condensed tomato soup
1 soup can full of water
1 tbs brown sugar

heat oven to 350°. Place cabbage in a greased baking dish (I use one that is about 7x11x2). Set aside. Brown ground beef w/ onion and drain. Add remaining ingredients to ground beef and stir well. Spoon evenly over cabbage. Cover w/ foil and bake for about 1 hour to 1 hour 15 min.

Thursday, December 25, 2008

Merry Christmas!!

I hope everyone who celebrates it had a nice Christmas (and even those who don't celebrate it-I hope you had a nice December 25th). I've been holding off on posting my Holiday cards so I'm going to post them here all at once. I only made 5 different ones this year.

stamp set: Two Cool Dudes from SU, Not Quite Navy craft ink and cardstock, Whisper White craft ink, Real Red cardstock, Stampin Up scallop edge punch, ribbon unknown, clear embossing powder, SU chalk for the cheeks and I used an orange zig marker for the nose. The white is shimmery cardstock (not SU but the same).


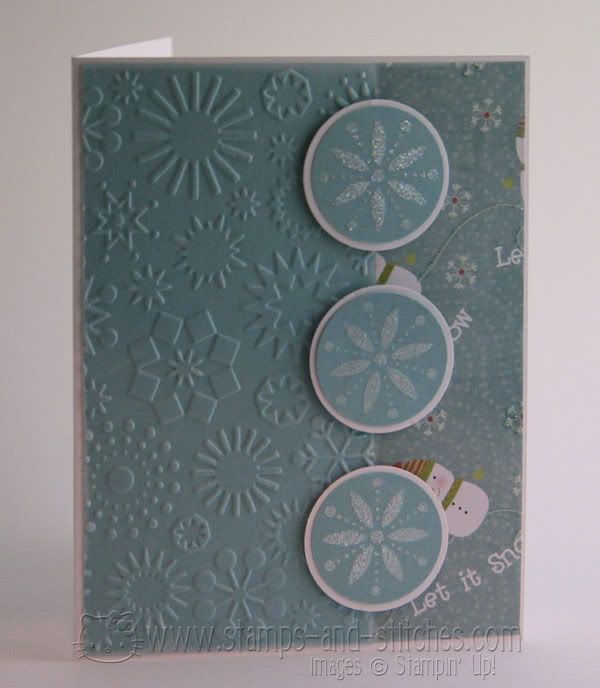
I *think* this was Ballet Blue cardstock, Snowflake cuttlebug embossing folder, Whisper White craft ink (rubbed over the snowflakes), Cricut snowman from Doodlecharms, hat from Paper Doll Dress up, Stickles for the hat band, rick rack for the scarf, you can't see it but there's diamond dust paper on the buttons, and I used an orange copic marker to color the noses (instead of cutting out separate noses from orange paper). Stampin Up chalk for the cheeks. The white card base is made with Paper Trey Ink white cardstock. The snowmen are cut from shimmery white cardstock and Chocolate Chip cardstock.


Real Red and Garden Green cardstock, shimmery white cardstock, Garden Green ink, red stickles for the dots on the tree, Snow Swirled stamp set, Many Merry Messages stamp set, Priceless stamp set (for the swirls-it's hard to see them), burgundy ink (I can't remember which burgundy but I think it was the older retired color), ticket corner punch.


Garden Green cardstock, shimmery white cardstock, stickers and rubons from Imaginisce, Tim Holtz distressing ink, Stampin Up scallop edge punch.


White cardstock from Paper Trey Ink, Pretty in Pink cardstock, Stampin Up patterned paper and chipboard frame (from the Country Living bundle), shimmery white cardstock, Imaginisce rubon, and the greeting stamp is from the Take a Bough set from Paper Trey Ink and I used Real Red craft ink to stamp it. Also used a Creative Memories corner rounder punch.

I never posted the ones I made last year so I'll post those in the next week or so.

Monday, December 22, 2008

Taco Soup-yum

This soup is super duper easy and we had it tonight. Steve loves it-the kids don't. They don't like soup (other than Chili and I guess I never thought of chili as soup. I've just always thought of it as chili). So the kids got frozen chicken nuggets. I love soup in the winter so they eat a lot of chicken nuggets and jelly sandwiches in the winter.

Easy Taco Soup

1 lb ground beef
1 onion chopped
2 cans tomato sauce (15 oz each)
2 cans diced tomatoes (14-15 oz each)
1 can green beans, undrained (about 15 oz)
1 can corn, undrained (same size as the beans)
2 cups water (or use one of the tomato sauce cans)
1 envelope taco seasoning (I make this myself-stay tuned for the recipe)
2 cans kidney beans (optional-I don't add these)

note: if you like it extra spicy, use the spicy diced tomatoes for one or both cans. Beware-it is hot (or maybe I'm just a wimp but to me it's hot)

Use a pretty big pan for this. My pans go from a 4 qt which is too close to being too small for this recipe to a 6 or 7 qt stock pot type thing so I use the stock pot. It only ends up about half full but my stovetop stays cleaner.

Cook ground beef with onion (I cheat and use minced dried onions). Drain well. Add everything else and bring to a boil. Simmer for about 10-15 minutes. Pour into bowls and garnish with cheese, sour cream, avocados, or whatever else sounds good. We just use crackers. I might add some cheese next time. This recipe makes a lot.

Taco Seasoning recipe

I found out that the packaged Taco Seasoning mixes have trans fat so I make my own. I do eat things with trans fat (like pop tarts, hamburger helper, betty crocker potatoes...) but if it's easy to substitute I try to do that. This is from Make a Mix which is a really fun cookbook.

2 tsp instant minced onion
1 tsp salt
1 tsp chili powder
1/2 tsp cornstarch
1/2 tsp crushed dried red pepper
1/2 tsp instant minced garlic
1/4 tsp dried oregano leaves
1/2 tsp ground cumin

Mix together. Makes the equivalent of 1 package of taco seasoning.

Wednesday, December 17, 2008

Baby card

I made this quick card for the daughter of a friend of mine-she just had her second baby. I cased this card from bigsky at SCS. You can see hers here. I had to change it a little because I didn't have the right colors of ribbon. I made the outfit on the cricut with the new arrival cartridge and the circles are cut with nestabilities. Paper is: Imaginisce, Stampin Up, and Bazzill. I think the ribbon is Stampin' Up organdy. Swiss Dots cuttlebug folder. The color came out funky-I need to use my light box in a different place I think. The light color cardstock is Stampin' Up Vanilla cardstock.


Tuesday, December 16, 2008

Basic Meatloaf

Meatloaf is probably one of Steve's all time favorite meals. Only thing is I hate making it. I am really weird about raw meat and I don't like to mess with it. I can put a steak in a pan, a roast in the oven, etc but I don't like to DO stuff with it. I don't want to cut it, pound it, roll it, stuff it, or in the case of meatloaf, mix it. In the past it was even more of a chore because the recipe I had had to be made in loaf pans and they are such a pain to clean. I was using these low fat two piece pans and even if I lined them with foil, I had to poke holes for the grease to drain out and it would end up getting under the foil and making a mess anyway. And lining both parts and then putting them together was like nails on a chalkboard for me. Foil rubbing against foil is not good. Another thing is that the recipe needed 1-1/2 lbs of ground beef and our beef is only in 1 lb packages-we get it frozen from the processor and have no choice, and I wasn't about to 'save' a half pound of beef in my fridge. So I'd use 3 lbs and make two meatloaves, which doubled the cleaning and required a 2 gallon freezer bag to mix it, which is not easy to find sometimes. So anyway I decided to find a recipe that didn't call for loaf pans and that I could use 2 lbs of ground beef instead of 3. I found one on allrecipes.com that called for 1-1/2 lbs but I converted it to use 2. It's very similar to my old recipe and honestly, I probably could have just altered my recipe to work but I didn't think about that until after I found this one. So I made it tonight (used a freezer bag to mix up the ingredients of course-I am not mushing raw ground beef through my fingers. eww.) and it turned out perfect. I did have to add some cooking time.

Basic Meatloaf

2 lbs ground beef
1 egg
1-1/4 cups milk
1-1/4 cups crushed crackers (one sleeve of townhouse crackers was just about the right amt)
1 onion chopped, or 4 tbs dried minced onions
1 tsp salt
pepper to taste (I don't even own pepper so I didn't add this)
ketchup

Preheat oven to 350°. Mix all of the ingredients together, whatever way makes you comfortable. Form into a loaf-like shape in a 13 x 9 baking dish. Mine was probably about 2" tall but it actually got taller in the middle during baking. Squirt ketchup all over the top. I didn't make a picture with it but I might next time. Bake for one hour and twenty minutes or until a meat thermometer reads 165° or so (original recipe said to bake for one hour). Mine was hotter than 165 (which actually makes me happy) but still very moist and not dry or tough. It was perfect and Steve's eyes actually rolled back in his head at one point. For maximum impact I may make fried potatoes with it next time. He loves those too.

Saturday, December 13, 2008

Candy Cane treat holder

We always give a food type gift to our mailmen (there are two), UPS man and the lady at the post office (she is a real sweetie) plus our trash pickup guys. So anyway I always add on a thing of candy canes. I usually just put the candy canes in a cellophane bag, make a patterned paper topper, and staple it on. Boring. This year I wanted to make something using some of my stuff that I just HAD to have. So I made these very simple, yet not as simple as usual, candy cane treat holder things. I used my nestabilities, big shot, scor-pal, stamps and ribbon. I think they look cuter than my usual ones. Stamp, real red ink and cardstock (whisper white and real red) from Stampin' Up. Also used nestabilities plain and scalloped circle and the scor-pal for all the scoring. The ribbon is from somewhere that I can't remember. Probably Walmart. Also a magnetic mat (for the nestabilities) came in very handy for this project.


Sunday, December 7, 2008

Chicken Soup

Today was my daughter's birthday and she got to pick what I made for supper. I didn't have all the ingredients for her first pick so she decided on chicken soup. I'm not sure why-I don't ever make chicken soup (in fact I don't think I ever have other than Campbell's) and she's never asked for it before. I've been sick the past two days though (with a cold) so maybe she subconsciously felt bad for me (had to be subconsciously because she would never openly admit that) and picked something that she knew would make me feel better. So anyway I appreciated it and made the soup plus some biscuits. The other two kids don't like soup (they have never even tried it) so they had frozen chicken nuggets. They love that junk. So anyway I found this recipe on allrecipes.com and tweaked it a little.

Super duper easy chicken soup

1 tbs butter
1/2 cup chopped celery
1/2 cup chopped onion (I cheated and used dried onion)
about 8 cups chicken broth (or water and chicken bouillon)
1 large can (about 13 oz) chicken, not drained
1 cup sliced carrots (I didn't have any so I didn't use these)
1/2 tsp oregano
1/2 tsp basil
1/4 tsp garlic powder
1/2 tsp salt
pepper if you like it (I don't)
about 2 cups egg noodles (I put in about 4 handfuls and I think each one is about 1/2 cup. I should have measured)

melt the butter in a 4 qt saucepan and cook the celery and onion for about 5 minutes. Add the chicken broth, chicken, carrots and the spices. Bring it all to a boil and add the noodles. Let simmer for about 20 minutes or so.

The kids had corn with their nuggets so I also put some of the leftover corn in the soup. It was pretty yummy with the corn.

Friday, December 5, 2008

My card for the magazine inspiration challenge

My room is still a mess but I was able to make this very simple card tonight. I used the round shapes on the magazine page for my inspiration as well as the background color. The snowflakes are glittery but it's hard to tell from the picture. Also I just got this new lens (today) and I'm still getting used to it. I forgot to switch my ISO after I had been doing some playing so it's a bit grainy. This proves that no matter how good or expensive your lens is, you might still take crappy pictures because you're just a bad photographer. lol. Anyway the cardstock is Stampin' Up Baja Blue, patterned paper from Imaginisce, ink is Stampin Up Whisper White, OLD heat and stick embossing powder from somewhere, Stampin' Up Dazzling Diamonds glitter, white Paper Trey Ink cardstock, Cuttlebug embossing folder (snowflakes), Stampin' Up circle punches.


Thursday, December 4, 2008

Magazine inspiration

It's my turn to post the inspiration challenge for the SCS Blogger group #1. I've decided to use this page from an OLD issue of Martha Stewart Living. Take inspiration from this page to make a card, layout, or whatever you'd like. Use the layout, the shapes, the colors, whatever. I will work on it tomorrow, hopefully. It's been pretty hectic around here. I'll also work on the prize for the winner, which will be chosen through a random drawing of everyone who does this challenge-so for now it'll be a surprise. I will probably post what it is when I decide what it is. Deadline will be 2 weeks from today which is December 18th (a week before Christmas-eek!). Please leave a comment with a link to your project. Here's the pic-click on it to see it bigger:

Friday, November 28, 2008

Chair makeover

I'm sorry I haven't posted in a while. The fact is, I haven't done anything. Well I did paint this chair and it was the project I needed to finish so that I could start making cards and layouts again. I bought this chair and a desk that matched it at a yard sale a long time ago. I paid a whole five dollars for both-great deal right? Well the desk (which was my old sewing desk) was not working for sewing anymore but I thought I would keep the chair since it has a fairly small footprint. I have the computer chair for my sewing desk but wanted a regular chair for stamping. Mainly because I take pictures of my cards in there and I can't hook my gorillapod on the computer chair. So I decided to take this ugly green chair and make it over.


I sanded it *a little* (didn't want to release possible lead dust in the air right? That was my excuse anyway) and repainted it. I think it might have had 5 or 6 coats of paint on it already so the finish was a bit...bumpy. And you could see old paint drips in some places. But I'm not entering it at the county fair or anything and I didn't want to kill myself making it look perfect so I just roughed up the old paint and painted right over it. We had to do a little bit of repair work (note the plain dowel-the old one was missing) but otherwise I did pretty much nothing. So here's the new one-painted green and pink to match my other stuff. The original plan was to paint green in those swirly decorative parts but I was lucky to paint a straight line much less a swirly one so I thought it would save my sanity just to leave it all pink.


I'll probably make a chair pad for it because it's actually not very comfortable.

Tuesday, November 18, 2008

Trashy Kitty

Oops it's been over a week since I last blogged. Sorry! I haven't made any cards or anything but I am still working on my room so I'll share this project. It's a trash can! I bought an unfinished wooden trash can at Hobby Lobby and painted it green (certainly celery to be exact). Then I masked it and painted pretty in pink stripes across the top and bottom. My masking is not too great. Then I put wall stickers on the sides. There is a lot of shadow and glare on these-the color is actually uniform in real life. I got my camera back but had to use flash because I don't have a spot to put my gorillapod right now so there's flash, reflection from the junk it's sitting on (yep my table is a complete mess, can't even see the top, and I just set the trash can right on top of it all), and it looks like some shadows on there too. I'm not positive if my camera is right or not. I am going to do some testing because I paid $200 to fix it and to me these weren't all that sharp. So anyway:


edit-there should be four pictures. Today only three were showing up so I switched the one to photobucket. I think I will have to start using photobucket instead of imageshack because this keeps happening. If all four pictures aren't showing up let me know and I'll fix them.

Sunday, November 9, 2008

My sewing desk...so far

I'm not done with it yet but here it is so far. This is how we cobbled it together. Steve cut the legs off four shelves to the correct height and then I bolted two shelves together for each side of the desk. Then I bought a sewing table that had folding legs and removed the legs, then bolted it to the top of the shelves. You can see how the shelves stick out on the ends. Right now I'm not worrying about it-someday I might fix up the top part (add plywood or something) so that it's all flush. It's fine with me the way it is though. Anyway you can see that big bunch of junk behind it-that is all on and under our old dining room table. It doesn't quite fit right though, and takes up way too much room so we are making a table to put back there that is going to be a rectangle (the current table is an oval which really doesn't mesh well) and will fit flush with the top of the sewing surface. It will just take some time to get it done since Steve has to help and he's still pretty busy with the crops. The way it is now I can finally sew something and maybe get some of the unfinished projects I have done.

So anyway there is mess all around it and behind it but ignore that for now. I need to clean it up. The baskets in the shelves are the ones I bought from Hobby Lobby. I painted them and let me tell you, baskets are not easy to paint with a brush. I had colors mixed though (pretty in pink and certainly celery), and didn't want to buy a paint sprayer so I just did it. The coverage isn't perfect but they're baskets after all-not meant to be perfect. The bottom baskets are not painted and may never get painted. The ribbon around the upper baskets is some cute Hello Kitty ribbon I found at Walmart. Then I have a Making Memories tool holder on top which is perfect for the sewing desk. It has those little drawers that are great for holding bobbins, needles, and all the other tiny things needed for sewing. I put some patterned paper in the label holders since I'm not planning to keep anything specific in the sections. I put hooks on the inside where I hung my quilting rulers-you can see the ones on the left there. There's another on the right. I have a lot of quilting rulers-this is only about a third of them. The rest aren't as big so they're in a different spot. The decorations on my sewing machine cover (Hello Kitty-what else??) is one of those adhesive wall decorations-I bought it at Target. I also have some Hello Kitty fabric that I might use to make a cover for the chair. Click on the picture to see it bigger.


Friday, November 7, 2008

Paper Craft Planet

I just joined Paper Craft Planet after seeing it on some of my friends' blogs. HERE is the link to my PCP page. Now I'm off to explore some more.

Oh my gosh-I was just looking around my dashboard and this is my 100th post!! Yay!!!

Thursday, November 6, 2008

A little change

I couldn't take the yellow anymore so I lightened it. I like it much better but the colors still look really strong to me-I'm just used to the soft lighter colors.

Also I got my sewing table pretty much done so I can finally clean up and make something soon!

Tuesday, November 4, 2008

Since I can't get into my stamp room...

I decided to redo my blog colors. I'm not sure if I like it. The background is kind of baby-poop yellow. I got the color scheme from the Color Schemer blog and at the time, it looked pretty cool. It's called "That's Hawt". How can you go wrong with that?? I'm just not sure yet-maybe I just need to get used to it. Oh and my signatures on my old posts don't match anymore. I'm not going to go back and edit every post to match it up so it'll just have to stay that way.

I did redo my banner a little but I kept the pictures because they are of some of my favorite things. Mainly my cute Hello Kitty sewing machine and also a mug with my name on it that my friend Krista made for me back in high school (many moons ago). Krista claims not to be crafty but I think she's wrong. I love my mug-it's super crafty. As for Hello Kitty, you probably can't tell but I'm a fan. I remember back when it first came out-we lived on Okinawa and my sisters and I would go off base to shop and buy lots of Hello Kitty (and other character) goodies. They didn't have nearly as much HK stuff back then as they do now but I sure wish I'd saved some of it.

Saturday, November 1, 2008

Bye bye baby :(

I have to send my baby away. My camera, that is. It isn't focusing right and I don't know if it's my camera, my lenses or both. So I will be packing it all up and sending it to Canon for evaluation. If it costs too much to fix (if it's the body) I will probably just upgrade the body. In the meantime if I make anything (which is unlikely right now as my stamping table is completely covered with everything that was on my sewing desk) I'll have to try to get a decent pic with my G2 (which, as you can see in my last post, isn't quite right either) or my S410.

On a positive note, I found the perfect baskets for what will become my new sewing table. My plan is to put a sewing table top (with the sewing machine section that is lowered down so the bed of my machine is level with the surface) on top of some shelves and use baskets in the shelves to hold my stuff. We went to Hobby Lobby yesterday and I found baskets that look like they were made for the shelves. Now I just have to wait for Steve to finish getting the crops in and cut the shelves to the right size for my table. Or maybe he'll do it on Sunday. When I get it done I'll take some pics. I *might* paint the baskets. I haven't decided yet.

Sunday, October 26, 2008

Magnifying glass anyone?

I got some Justrite stamper stuff in the mail today. I got the wooden circle, a set of borders and centers, and the small letter set. Let me tell you, when they say small they mean teeny weeny small. It took me all of 30 seconds to lose one of the things and probably 30 minutes to find it. It was a miracle I found it at all. They are about 1mm x 2 mm (maybe a tiny bit bigger) and gray, so they blend nicely into any and all shadows. Plus I have this hi-low carpet in my scrap room and stuff really hides in that. So anyway by the time I found it I was completely out of the mood but I forged ahead. I made this simple card using a sketch from one of the Joy of Cardmaking magazines. After I had my patterned paper thing on the front all cut, torn and sewed, I noticed I had included the Stampin' Up logo on the corner. ARGH! So I got out my Close to Cocoa ink (which matches this paper) and my Tim Holtz foam inky thingy, and inked up the edges. I thought it covered it up rather nicely. The picture came out a little funky. My DSLR is acting up on me so I decided to try my old G2. Poor thing-it barely works anymore.

materials list:
Cardstock: Stampin' Up Certainly Celery, Bashful Blue and Whisper White
Patterned Paper: Stampin' Up Petal Patch Designer Series paper
Inks: Stampin' Up (Close to Cocoa and Certainly Celery classic ink and Bashful Blue craft ink)
1-3/4" circle punch
1/4" circle punch
Nestabilities
Sewing machine
Tim Holtz foam ink spreader thing
Stampin' Dimensionals
Letter stamps: Justrite Stamps
flower stamp from the Stampin' Up Big Pieces set

edit-now that I look at it more closely, I think I put the S on upside down-on both places!

Thursday, October 23, 2008

Copic book page links

I uploaded these to my website but I am not sure on the status of that right now so if they don't work or they quit working, let me know and I can find another host. I am planning to discontinue my paid site and just use the blog. In the meantime I haven't gotten a bill or been charged for probably 2 yrs and half the time I can't even log into my account area (like right now).
Small book pages
Large book pages

edit: my old website is not working anymore so I've uploaded them to 4shared.com. If anyone knows of any better file storage site please let me know.

Copic book

I found the idea for this book on this blog by scs member 3 little love bugs. I thought it was such a great idea so I copied it! I made one large version to keep in my stamping room and one small version to keep at the computer or in my purse so that when I shop for copics I know what I have. I know it's hard to believe but I've bought the same thing twice before. So anyway this is the outside. I made them pretty plain because they're just for me.

Patterned paper: My Mind's Eye (small) Fancy Pants Designs (large)
Letters: Cricut Mickey Font on the small one. KI Memories Bubble Letters stickers on the large one.
Prima Flowers and a brad on the large one
Bind-it-all

This is the inside. I didn't want to use the chart that 3 little love bugs used because I couldn't cut it out neatly with a margin on the outside so I made my own in Word. My original plan was to make one with the 22 lines and then one with 44 but after typing in 322 colors and numbers, I decided that was enough so I just made the smaller tables close together and used that for the larger pages. If anyone wants this chart let me know and I'll figure out a way to post it. I colored it all in before I bound it so that it would be easier to avoid the bleed-through. I will have to be sure to only color on one sheet at a time for any color updates. On that sheet on the left of the small book, you can see an extra bleed-through. That's where I dropped a pen before I had a chance to cap it. Bummer but I wasn't going to redo it. These pens color and bleed through FAST!

Wednesday, October 22, 2008

Blog candy has been delivered!

Yay! Congratulations Erin! I wanted to wait until she got her pkg to post this topper that I made. I put the topper on the bag very crookedly. Once it was stapled on I wasn't going to mess with it but I didn't think she'd mind.

Materials:
Greeting cut on the Cricut using the Alphalicious cartridge
Cutie Pie designer series paper
Mini Glue dots and Doodlebug glitter for the flower centers

Sunday, October 19, 2008

And the winner is...

Erin!! Ok so it was 12:01. I got distracted. So here's the random.org thing (apparently they're not on the same time zone as me?):

Here are your random numbers:

27

Timestamp: 2008-10-19 04:01:08 UTC

Erin's comment
I'm not to late am I....Stampin up stuff yepeee... Gale I want it all....I just might have to do some blog candy too, sometime soon...
Erin

So Erin, send me your address and I'll get your goodies sent right away!!

Friday, October 17, 2008

Lazy...

I've been doing nothing for the past few days. I got some goodies in the mail but haven't used them. I've had a cold for the past 6 days so I am feeling sorry for myself. I'm SUCH a baby when I'm sick. Almost as bad as a man, if you can believe that. I'm not too sick to do the blog candy drawing though-don't worry! However, I don't know why I put that link at the top since the blog candy post stayed on top for the entire week. hehe. I was going to make a card or something tonight but my dishwasher seems to be on the fritz (actually it's the water heater that's messed up but the dishwasher uses hot water so therefore it's not working so great either). So I am off to hand wash the dang dishes and off to bed.

Friday, October 10, 2008

Blog Candy-finally!

I'm giving this away to pay-it-forward for the scor-pal fairy bringing me a scor pal complete with mat and extra scoring tool. It took me a while because I wasn't placing an order until October 1st and I wanted to have the items on hand before I posted it. As much as I love Stampin' Up, they do have backorders from time to time. So anyway this is what I'm giving away. I may do this again some time because it was fun picking out stuff to give away. The giveaway consists of one pack of Stampin' Up Designer Brads (Filigree assortment), one pack of Stampin' Up's Clips assortment, one pack of Stampin' Up Designer Buttons, and one bottle of Frosted Lace Stickles. All you have to do to enter is post a comment. You don't have to post something profound or anything-just any comment will do (as long as it's not mean or nasty). If you don't have a blogger blog where I can get ahold of you (should you win) be sure to check back after I do the drawing. I'm going to use random.org to draw it so it's all nice and fair. I'll do the drawing around midnight eastern time on Saturday, October 18th. This is my first ever blog candy so I hope I don't screw it up! Here are the goods:


I will try to put a sticky post at the top of my blog for a reminder until I do the drawing.

edit-OOPS on the date! lol. I put August..duhh... When I was getting ready to type it I had August in my head and I said to myself, "self, do NOT type August". And there I did it anyway. So now it's fixed and it's October. NOT August! That would be a LONG contest!

One year old

This layout is for the Walk Down Memory Lane design team blog sketch challenge (that's a mouthful!). I pretty much followed the sketch exactly. I cut the petals out freehand and then stitched around the edges. The patterned paper is from My Mind's Eye. The darkest cardstock is KI Memories, the medium pink cardstock is Bazzill and the lightest cardstock (journaling strips) is Stampin Up. The flower center is a die cut shape from My Mind's Eye (it was all one set of paper and elements). The letters and number are cut from the Plantin Schoolbook cricut cartridge. I cut the number 1 from thin chipboard using my new deep cut blade. The scallops are just circles that are partly under the strip of patterned paper. Click on the picture to see it bigger but be warned, it is pretty big (about 150 kb).


Monday, October 6, 2008

Easy apple crisp with cheese

I don't know about other people but I had never heard of having cheese with apples. Maybe I'm sheltered. Anyway my husband loves this apple crisp with cheese recipe that I got from his mom. It's easy too.

Apple Crisp with Cheese

4 or 5 apples (I usually use yellow delicious apples)
1 tsp cinnamon
1/2 cup water
1 cup flour
1 cup sugar
1/2 cup (1 stick) butter
1 cup (4 oz) velveeta cheese, cut up (see note at the end of the recipe)

Preheat oven to 350°. Peel apples and cut into slices (I peel first, then cut into quarters, cut out the core, and then slice across each wedge into about 1/8" thick slices). Put them in a baking dish-I use an 11 x 7 dish but I have also used a 9 x 9 dish. The apples should come about 1/2 to 2/3 of the way up the dish. Sprinkle apple slices with cinnamon and mix them around to coat them all. Add the water but don't pour it right over the apples or all the cinnamon will come off. I carefully pour the water in between the apples. Set aside.

In a medium size bowl, mix the flour and sugar. Cut in the butter until the mixture resembles coarse crumbs. Add the cut up velveeta and toss to coat. Sprinkle evenly over the apples in the pan. Bake about 50-60 minutes.

note: Cheddar cheese can be used for this recipe but I have found that it gets hard and chewy. For the velveeta, I use lo fat and also, I slice off about 1/4" slices and then cut them up into about 1/2" squares. You have to separate them with your fingers to put them in the dry mixture and it will be messy but it's worth it. If you buy the pre-grated velveeta that's even easier. I haven't tried it yet.

Wednesday, October 1, 2008

Baby Giraffe

These pictures were taken about 3 yrs ago at the Indianapolis Zoo. I could not find any info on this little guy but he sure was a cutie. Cardstock is Bazzill, patterned paper is KI Memories. The giraffe and the letters were cut from the cricut Zooballoo cartridge (the tail on the g is hard to see in the scan-it's easier in real life). Ribbon is from American Crafts, felt flowers from Stampin Up and brads from Bazzill. This is a sketch challenge from the design team blog at A Walk Down Memory Lane. Click on the picture to see it bigger (it is hard to post layouts here-I don't want to post great big files because I know some are on dialup).


Tuesday, September 30, 2008

Couple of cards

This blogging group is really making me kick butt on the cards and layouts! I did these two cards the last couple of days and I have a scrapbook page almost done. The first card-I got out my Joy of Cardmaking magazine and just flipped to a page and used that sketch. I then grabbed a stamp set from my 'not used enough yet' pile and came up with with Crab and Company. So I made this crabby birthday card. Cardstock, patterned paper and ribbon from Stampin' Up (remember the old organdy ribbon? I still have a bunch of it). Colored with Copics (still having a hard time keeping the color from bleeding over the edges). Stamps are Crab and Company and Sandy Shells wheel. I had no idea what color a starfish is supposed to be so that's probably the wrong color. Oh well.


This is from Beate's sketch challenge. I didn't get it done in time but that's ok. It made me make a card and that's good. I normally don't post my Christmas cards and probably will not post any more this year until after Christmas. Some of the people on my Christmas card list read my blog and that's why. I'll just be sure to send this one to someone who doesn't read my blog. The cardstock is from Stampin' Up, patterned paper is the Snowy Jo line from Imaginisce (I love this pp-it's so cute and glittery). The stamp is from the So Many Scallops set.

Monday, September 29, 2008

Some of my storage

There's been a lot of talk lately about storage so I took some pics of what I use for my nestabilities and copic markers. I will post two cards later tonight also but didn't want to put too much in one post.

So anyway, a while back I posted about storing nestabilities in a notebook using mat board and magnets. It was great as long as I didn't use it but as soon as I flipped through pages to find what I wanted, the dies would fall off. So I am using this now and so far I love it. How could I not-it is SO cute!!

The outside (the cute part)


the inside:


and I can even fit my long ones in there although I may try to find some pages where the two slots are on a single long page.


Copics: I use the Quickutz Magpie storage system for my copics and a lot of my other goodies. I keep my copic-safe inkpads in one of the drawers and the other one holds sponges (which I barely use so I may put them somewhere else and use the drawer for something I use more often).

Friday, September 26, 2008

Wubba layout

Here's a layout of Daisy and her Wubba. I don't usually put this much "stuff" on a layout and I'm not sure if I like this layout but I wanted to use some of my stuff, ya know? I never use it. So anyway the specs: cardstock is Bazzill (both sides match in real life. My scanner is fickle), patterned paper is 3 bugs in a rug. The scallops were cut using my Stampin' Up scallop edge punch. The shapes are from cricut cartridges. The hearts are from Fabulous Finds, the swirl is from Stretch your Imagination, and the dog is from Paper Pups. The letters are from Cuttin' Up. This is from a sketch in the book Page Maps by Becky Fleck. Click on the image to see it a little bit bigger. Click here to see it even bigger (about 150kb)


Sunday, September 21, 2008

Some new cards-finally!

I made these in the last few weeks but it has taken me forever to get the pictures done. For one thing my beloved DSLR seems to be taking soft pictures all of a sudden. This is even with a tripod so it's not my unsteady hands. I don't know if it's my lens or what-I need to do some tests I guess. Even so it is still better than my old point and shoot by far so it's still my baby. Frustrating though. Anyway these all use SU cardstock plus the following:

This is done with the Very Punny set (I think the sentiment is from Unfrogettable)plus Prints Designer Series papers plus some rick rack from Doodlebug. I colored it with Copics (what else?)


This one is made with the Eat Cake set and SU craft inks. Plus Prints Designer Series paper and nestabilities. Also some sewing. I used Spica Glitter Pens on the candle tips but you can't tell from the picture.


This one is made with the Pretty Princess set. Colored with copic markers. I used a cuttlebug embossing folder plus nestabilities. I'm not sure who makes the ribbon. I used Spica Glitter Pens on this one too.


This one is made with the Vases in Vogue set and colored with copic markers. I used some old patterned paper (can't remember who makes it) and my nestabilities and sewing machine. Don't know who made the ribbon either.


I really didn't like this one much but I'm posting it anyway. It's made with Big Blooms set and also the Posy background. Plus some Prints Designer Series paper.


This one is a nestabilities nightmare. I got the embossing borders and wanted to try them. So I did the card front and it looked too plain so I added the ribbon. Then I had my image all ready and mounted on just one scalloped square and it was waaaay too small. So I thought hey, I'll just add another layer. And it was still way too small. SO I said to heck with it and added the third one. It was heavy but so far it's hanging on. I don't really like it much but as slow as I am making cards I can't afford not to post them all. It's made with A Flower for All Seasons and colored with copic markers. I also used some Prints Designer Series paper (I love this stuff). I can't remember which cuttlebug embossing border plus some American Crafts ribbon and of course the nestabilities.


And after all these I am still really awful at coloring with these markers. I'm still working on it though..

Wednesday, September 3, 2008

Thanks to all the commenters

I want to thank everyone for the comments on Jake's picture. He loved reading them and now he has quite the big head. He said "oh I can make more pictures!" so I told him I would start up his very own blog for posting his pictures. I can just see him making a dozen pictures a day and making me put them on MY blog.

Also I did not get the pictures of my cards taken yet. One of my jobs is to keep the Fishing for Deals Tupperware page updated and I had to work on that tonight. It was the worst yet-their page builder is great as long as you don't want any creative freedom. Since I do I have to use code and their site isn't friendly for that. It takes forEVER. I worked on it for about 4 hours tonight (this morning) and it isn't done yet (for September) but I am so I am off to bed.

Tuesday, September 2, 2008

New links added

I added a bunch of links to some of my favorite blogs plus other sites where I sometimes hang out. If anyone has suggestions for blogs or websites please let me know! Now that I can, I like to look at blogs and other crafty sites a lot.

1. I will be doing the Stampin' Up giveaway (a pay it forward RAK from this post) very soon. I need to decide what I am going to give away, order it and get it, and then I will post the giveaway. I don't want to give away something I don't have in hand.

2. I will be posting some cards soon. I have some made but haven't taken pictures of them yet. I can't post too many times in a day or I think my blog will get flagged by Blogger. Weird-I've never had a problem with posting too much.

Monday, September 1, 2008

Jake's Pokemon Picture

Jake subscribes to the Beckett Pokemon magazine. He saw they had an art gallery so he decided to draw a picture for it. He had it all ready to go and asked me to address the envelope. So I look at the magazine to get the address and get this-he has to send in $29 for them to put his picture in the gallery!! In this issue they had 63 pictures in the gallery, so that works out to over $1800 they made JUST FOR USING ABOUT EIGHT PAGES OF THEIR PRECIOUS MAGAZINE!! They publish monthly so you can only imagine the profit they are making off these little kids! Needless to say I don't have $29 to give them the privilege of printing my child's picture in their magazine so I promised Jake (who is so sad about it) that I would put it on my blog. That is the best I can do. So here it is-this is a smaller version. Please click on it to see it in its full size glory. :)

Sunday, August 31, 2008

Busy Sunday

First of all my public service announcement. DO NOT buy an eMachines computer. I researched and a lot of people loved theirs. I was reluctant and had a bad feeling about it but I bought it anyway. It did fine I guess but it's 2 yrs old, still under warranty, and it is a piece of junk. It works. But it's slow, it's loud, and half the time the dvd drive doesn't recognize a dvd or cd. When it does recognize a disk it takes twice as long (at least) as the other computers do for it to start up. So it went to the Geek Squad today and hopefully they will fix it. If not (if it's a software issue I am not having them fix it since the warranty apparently doesn't cover that) I will just reformat and hope it lasts another two years.

While we were in the town where Best Buy is (about an hour away from home) we went to Petco. Someone at 2peas had posted about how much their dog loved his Kong Wubba toy. Daisy is somewhat of an aficionado of dog toys and really wants to try as many as possible so we bought her her very own Kong Wubba. You can see that she approves:


Then tonight after supper I made Peach Cobbler. Yummy. Here's the recipe-it is super easy and not as fattening as some I've seen:

about 6 peaches, peeled and sliced (if you like lots of peaches in your cobbler feel free to use more)
2 tbs lemon juice
1/4 cup sugar
1-1/3 cup flour
3 tbs sugar
1-1/2 tsp baking powder
1/2 tsp baking soda
1/4 cup butter
2/3 cup buttermilk
2 tbs sugar mixed with 1/8 tsp nutmeg and 1/2 tsp cinnamon

Even though it is August and it's peach season, I used frozen peaches from last year. So I skipped the peach baking step and since they were sweetened, I also didn't add the sugar to the peaches. Also, to peel peaches easily dip them in boiling water for about 1 minute, then put them in a bowl of ice water. The skins will peel right off. Then slice them into the baking dish.

Heat oven to 400°. Place peaches in a 2 qt baking dish. Add lemon juice and 1/4 cup sugar and stir to coat. Cover with foil and put in the oven for about 15 minutes. If you use canned or frozen (thawed) peaches you can skip this step. But drain the peaches first.

Mix flour, 3 tbs sugar, baking powder. and baking soda in a medium bowl. Cut in butter until mixture resembles coarse meal. Add buttermilk and stir just until moistened.

Drop the topping by large spoonfuls onto the peaches (hot ones if you used fresh peaches). Sprinkle top with the sugar/nutmeg/cinnamon mixture.

Bake uncovered for about 30 minutes or until topping is browned.

Serve warm with ice cream or whipped cream.

Wednesday, August 27, 2008

Back from vacation

We just got back from our little vacation a few days ago. Here's a picture-can you guess where we went?


Here's another that might make it easier:


Yep, we went to Niagara Falls. Yes, it's touristy but it's amazing. It's gorgeous and has a lot of interesting history (which we learned while on a tour). We went on the Cave of the Winds and the Maid of the Mist and despite having the garbage bag-like raincoats, we still got wet (mostly from the knees down and the neck up). We also went to a few lookout points and parks on the tour. We also drove into Canada and despite what I have read, the Canadian side is not better. It may be if you like ultra touristy things like cheesy museums (sorry to the cheesy museum lovers) and a million shops-there's a whole strip-like street of that. And a giant crowd. But on the US side there are no big casinos, no hotels, just the parks, the trees. It's beautiful. Canada was ok though-we went to a Zeller's and bought some safe nut free candy (making the whole trip into Canada worth it) and ate at a very expensive Subway (which we can't do in the US).

On the way home, we stopped at Splash Lagoon in Erie, PA. The kids had an absolute blast and for them, it was the highlight of the whole trip.

All in all, it was a nice quick vacation and we were glad to get home. Now I am going to work on finishing up my room if it kills me.

Wednesday, August 13, 2008

Busy busy busy!

I have been busy working on my craft room, making a dance bag for Sammy, watching the Olympics (ok so that may not count), and doing some other things. In the meantime the new Stampin' Up catalog has come out!! I put a link to download it in the sidebar. If you're on dialup and want a hard copy of the catalog, email me to see about buying one.

Wednesday, July 23, 2008

Older than dirt...

It's official-I am disgustingly old. I got my first bifocals today. They aren't really SUPER bifocal-ly and the optometrist said I was on the brink of not needing them. But I figured it was time to stop having to take off my glasses and put stuff right up to my eyes to read tiny type like ingredient lists (which I read a lot of) so I got them. I picked them up today-I got this frame:

Which is a Vera Bradley with the Java Blue design on the sides. I didn't set out to get Vera Bradley, but they just so happened to be the ones that I liked and felt most comfortable in. As a bonus, they match my Java Blue Villager bag which I carry in the winter. Oh and they were 20% off. Can't pass up a sale. They put an ultra light (high index?) lens in because I'm practically blind and a 'progressive' bifocal which might as well be a trifocal. Not too easy to get used to but hey, it's the first day.

So anyway they did adjust them some but they need tightened because they keep sliding down my nose. It is really really annoying so I did the ultimate dork thing. I found Jake's elastic band that he uses on his glasses when he plays football and put it on my glasses. They are a bit plastered to my face now but they aren't sliding down. I won't wear the strap in public but until I go back and have these adjusted again (tomorrow) it is staying. At least it matches-it's about the same turquoise color as the design on the sides of my glasses.

Sunday, July 13, 2008

Working on my room

I haven't made anything lately because I've been doing some work in my craft room. We (Steve and I) extended the table back to the wall, I painted it, and I got a couple of new organizing things. Here is the before pic. Note that my desk was VERY messy when I took this picture. This is how it looks most of the time because I tend to wait until it's so bad I can't do anything before I start putting stuff away. I'm working on this because I like it better not messy. Now my desk will always look somewhat messy because I have a lot of stuff and I like it to be around me. Which means it's all over my desk. But this was pretty darn bad and I can't believe I'm even showing it. I took this picture a few months ago and didn't save it in a big size so it's hard to see the detail but trust me, it's bad. By the way that paper is over my lamp because the bulb sticks out and blinds me so I had to make a makeshift shade for it. I'm shopping for a new lamp.

This is after SOME of what I'm doing. I still need to install new pegboards on the back and I'll replace that magnet board with a smaller one that I can hang. The one I have is just resting on my table and when I go to take something off of it, it falls over. Anyway so far I think it's better. It couldn't get any worse. Like I mentioned I added about 6" to the back of it (it was about that far from the wall and everything always fell down the back. But I couldn't get it closer because...well it's complicated. I just couldn't.) I painted it all white and the pegboard will be white as well. I'll be painting that ledge and maybe decorating it with something-probably Hello Kitty. I bought some Hello Kitty fabric to make a chair cushion too. I love Hello Kitty.

So anyway I will update as I go. I'm planning to paint my other furniture (chair, rest of the desk (it's an L shape), sewing desk) white also and then use pink and green decorations. Then maybe I can actually get something done.

Friday, July 11, 2008

Surprise in my mailbox!!

I got a nice surprise in my mailbox today:

It seems that the Scor-Pal fairy decided to bless me with a brand spankin' new SCOR-PAL! Plus she included a Scor-mat and a spare scoring tool! I am so excited to try this out. I am in the middle of some serious scrap room reorganizing but I'm going to make something soon anyway. I'll just have to make it in the living room or something. I actually have the Scor-it tool but there have been a ton of threads at Splitcoast Stampers about the Scor-pal and everyone raves about it. So lately when someone has asked about it, I always reply that I didn't have it and never tried it but had never read a single negative review of it. Well I don't know if that was why I was given this or not but I will obviously continue to tell people about the Scor-Pal!

Now this is a pay-it-forward RAK which means that I'll be doing a giveaway as well! Since I'm a Stampin' Up demonstrator I am going to wait until the new catalog comes out in mid-August and then I'll pick something out of it to give away on my blog. Stay tuned!

Monday, June 30, 2008

New used minivan

We traded our van a few days ago. We only had it for a year-right after we got it (it was used-a 2004 Freestar) the brake drums/disks/whatever needed to be replaced. About 3 weeks later we left on our vacation, driving across the country. The first day, the transmission light came on. Luckily we were close to Des Moines, and had easy access to a couple of Ford dealers and plenty of shopping and things to do. We took it in to the dealer the next day and were told that the transmission needed to be replaced or rebuilt. To save money we opted for rebuilt but it still cost about three thousand bucks and put us back a day and a half on our trip. Kind of put a crappy start on our vacation. It was fine the rest of the time.

A few months after we got the Ford I noticed an annoying whining sound pretty much all the time. It got louder when the accelerator was pushed (which is just about the whole time you're driving, ya know?) and I had to have the radio on all the time to block out the sound, although I could still hear it even above that. I have pretty sensitive hearing though.

So then a few months ago the cruise control suddenly quit working right. We would have to push the button about 10 times for it to come on and eventually it took about a hundred pushes (yes, I counted). Then all of a sudden it started working again. Weird.

Then last week or maybe the week before, I heard a high pitched beeping. Not a regular beep though but it was definitely there. Steve could hear it if we were all very quiet. It was there. Then he said he was worried about the transmission again. I don't know why and I think he didn't know either but we both knew the warranty on that repair job was long over. So he started to really talk about trading it.

I found a few online that we could go check out. We drove forever to one dealer where we wanted to look at a 2004 Toyota Sienna. It had a lot of miles but I convinced my Ford-loving husband that it would still be a better car and more reliable than Ford. At least I hoped so. We got there and saw that van (which was gold-not my top pick of colors but you can't be too choosy with a used car) but the dealer had also just gotten in a 2003 Honda Odyssey that had about 15K less miles than the Toyota and about 30K less than our Freestar. It didn't have quite as many options as the Toyota did (both same price) but Steve decided for the same money, it would be wise to go with less mileage, even though it was a year older. I think he liked the color better too but he probably wouldn't admit that.

So he made an offer, and they said no, the price was firm. So he made a slightly higher one and they still said no. We said ok, see ya and left. We had some lunch and then, being persistent as always, Steve called them to see if they had decided to go any lower. Keep in mind this was about 20 minutes later. They talked for a while and made him an offer. The offer was less than the #2 offer he made. I think they thought he had already included tax in his offer which he had not. So it ended up being a decent deal. He kept saying it was more than he wanted to give but he says that every time. So we drove the two hours home in our new used Honda Odyssey:

Keeping in mind that this is a HUGE step for him. He has always 100% owned Ford vehicles. Always.

Thursday, June 19, 2008

Happy Birthday Daisy!

Today, the 18th (it's past midnight), was Daisy's first birthday. We bought her a tire with a rope on it. Jenny stuffed two dog biscuits inside and wrapped it up. After a little help Daisy managed to unwrap it and took off running with it. She wasn't letting anyone play with her toy-it was too new. In a couple days she'll be sharing. Here's a picture of her with her new toy. Probably won't be a favorite because it doesn't squeak but she seems to like it.


Oh and for a comparison here is a picture of her just last August at 10 weeks old.


Related Posts Plugin for WordPress, Blogger...